
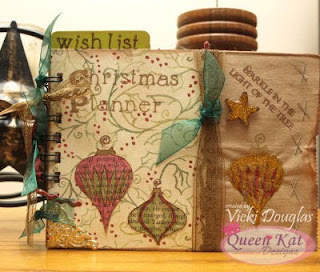
 Today I have a super fun project to share with you. It's a vintage Christmas Planner. It has 3 sections: Wish List, Shopping List, Schedule... To me these are the most important things we need to have lists for while we are getting ready for the holidays. You can use it to plan your meals, family gatherings and all kinds of things.
I used paper lunch sacks as my base along with the 3 "File tabs" that came in the Fall Into Christmas Vintage kit at QKD. They were the purrfect size to fit into the paper bags. What I did was I cut off the closed ends of the bags so I had the open frayed ends. I put about 3-4 inches of the bag onto the file tab and stapled them with decorative X's down the side. Then I applied my patterned paper over the left side.
 I stamped it up with the Christmas Ornaments that come in the stamp set of the kit and I added some by using my alphabets from QKD. Those stamps come in handy with loads of things!! For the coloring on th ornaments, Iused my prisma pencils and gamsol. To get the text behind the ornaments on the left side of my book, I stamped them onto the novel pages that came in the kit.
For the large ornament seen above, I colored it then covered the whole thing with crystal lacquer.. Yeah that took a pretty minute to dry. :) ooo... I just remembered, I didn't color that one with pencils. I filled it in with stickles.. let them dry over night and then covered it with crystal lacquer. It is so shiny and sparkley it's gorgeous.
The little wooden star was inked with Chestnut roan chalk ink and I added gold stickles and also covered it with lacquer.
I'll show you the inside pages then leave you for today.. :) I'll be back Thursday with more of this book. Tomorrow I'll be here with Royal Kat Wednesday. I have a special guest's card to blog about. :)
So for the inside pages, I used the closed ends of the bags as my base alternating open end out and open end in so you can instert more lists, reciepts, tags or other things in the open ends for safe keeping. I cut a piece of notebook paper and affixed it to each page front and back. Then I stamped them with an ornament with Olive chalk ink. --ok so blogger isn't letting me add more pictures.. grrr. I'll try to insert it later. :)
Have a great day!! oh.. PS.. you'll have a chance to win this on November 19th!


4 comments:
VICKI!!! omg...i LOVEEEEEEEEEEEE THIS!! soooooooooo super gorgeous!!!
awesome, awesome and awesome!!
so inspiring!
This is great, super creative...I love that you used paper bags...
Great idea!
This is so stinkin' cool, I just want to see MORE pics of it!! =)
Post a Comment